1 Starting to collect the equipment we will need for the 90 SW Reef tank. We got the Vortech MP10 and Reeflink from the guy we bought the Waterbox 40.2 AIO from. We bought the rest of the stuff from Top Shelf Aquatics in Winter Park, FL. Since the tank will be in the family/TV room we opted for an DC return pump (Ecotech Vectra S1) because it should be quieter. We will add a Vortech MP40 powerhead once we get the tank going. |
 2 We are going to do a basic sump system with a nice protein skimmer (No refugium for now). |
 3 Starting to work on the drain plumbing. We bought a new 'Reef Ready' Aqueon 90 because we managed to put some nice scratches in the existing FW Aqueon 90. I plan to use a "Harbie" style drain for the drain plumbing. |
 4 |
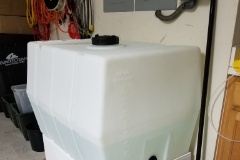
 5 Building a platform out of 3/4" plywood for the 100 gallon RODI water storage tank. |
 6 Building a platform out of 3/4" plywood for the 100 gallon RODI water storage tank. |
 7 The 100 gallon potable water storage tank for RODI water. |
 8 6 stage RODI water maker for both freshwater, saltwater aquariums and emergency drinking water. |
 9 We went to the MACNA 2019 show in Orlando on Sunday. Unfortunately many vendors had already left by Sunday morning because of the hurricane threat. We did end up buying a bunch of reef rocks from the SolviReef guys. This was the reef I came up with on the fly while at the show. |
 10 We went to the MACNA 2019 show in Orlando on Sunday. Unfortunately many vendors had already left by Sunday morning because of the hurricane threat. We did end up buying a bunch of reef rocks from the SolviReef guys. This was the reef I came up with on the fly while at the show. |
 11 I wanted to paint the back of the aquarium black and my first (failed) attempt was using latex paint. This was after taping in prep for painting. |
 12 After the first coat of the latex paint. I did a second coat, waited for it to dry, but when I pulled the blue 3M painters tape the paint just peeled off. |
 13 I used Flex Seal spray to coat the bottom of the stand Hopefully it might provide some protection in the event of a minor leak. |
 14 After the latex paint failed, I tried using the Flex Seal spray on the back of the aquarium. It appears to have adhered much better to the glass than the latex paint. Albeit kind of lumpy on the right side, however the lumpiness is not visible from the inside of the tank. |
 15 |
 16 I used unions on both drain lines (primary on left, emergency on right) and the return pump line as well. |
 17 I used 3/4" PVC flex pipe coming out of the Vectra return pump in order to try to minimize the pump vibration noise. |
 18 Initial testing of the plumbing. No leaks, drips, etc. The Vectra S1 return pump is very quiet. Tuning the Herbie style drain with the gate valve seems like it might be somewhat fiddily. |
 19 We are using the loc-line double return outlet provided with the Aqueon "reef ready" aquarium kit. I plan to drill an "air hole" in the loc-line fitting near the water line as a siphon avoidance mechanism. |
 20 The Eshopps RS-200 sump. We will be running a Reef Octopus Regal 150 Protein Skinner in the center section. |
 21 The gate valve for the primary drain. |
 22 Laying out the Solvi Reef rock pieces in order to theorize/test some reef designes. |
 23 |
 24 Lots of rocks to choose from. |
 25 Ok, but too symetrical. |
 26 The Aqueon 90 is less than 18" deep from front to back which is definiitely a compromise when trying to build a reef. |
 27 I installed four 18" long T-track rails on the 'ceiling' of the canopy in order to provide mounts for the Radion XR15 lights. |
 28 The profile of the T-track will allow a "T-nut" to slide along the track and hold up the Radion lights above the tank. |
 29 I found that the Radion mount screws are metric 5mm-0.8 thread and I bought appropriate length bolts and T-nuts to slide in the T-track. |
 30 One light mounted (temporarily to verify the fit). The back side of the canopy is open which should hopefully reduce the liklihood of overheating (the lights or the water). |
 31 I decided to use Tropic Marin Pro-Reef salt because that's what Top Shelf Aquatics says they use in their coral farms. |
 32 We are going to use CaribSea "Reef Sand" 'live' sand. I bought four 20 lb bags. Hopefully that's enough. |
 33 Moved the tank into the family room. Added the plastic egg crate and basic reef structures. I will be adding addional small rock base sections after I add the sand. |
 34 We need to add a second powerhead. Still deciding between the Vortech MP40 (wife's preference) or something less expensive like the Skimz SS9.0. |
 35 Light from the Radion XR15s |
 36 |
 37 |
 38 Starting to fill the tank with saltwater. |
 39 |
 40 The right end of the tank. |
 41 The left end of the tank. |
 42 Interesting prism effect from the Radion lights. |
 43 The tank is full but the sump is not full yet. |
 44 The right side structure. |
 45 The left side reef structure. |
 46 Overall room the tank is in. |
 47 I drilled three 1/8" holes in the Loc-line fitting just above the water line to function as an anti-siphon mechanism. Seems to work but it will be interesting to see how long it takes for those holes to clog up with calcium or algae.... |
 48 The water is starting to clear up. |
 49 I still have not fired up the protein skimmer or the IceCap ATO. |
 50 The funky prism effect went away after filling up the tank to the proper level. |
 51 Labels for the power outlet strip. |
 52 We are pretty happy with the overall aquascape of our 'reef'. |
 53 Fired up the Reef Octo Regal 150 Int protein skimmer. It is producing tons of micro bubbles that are escaping into the display tank. LFS says that's normal for the first week or so. |